 on the toolbar or choose Smart Connector from the Insert
menu.
on the toolbar or choose Smart Connector from the Insert
menu.ConceptDraw offers you powerful methods for connecting shapes: by gluing the
connectors to shapes or to their connection points,
you can establish connections which will be preserved even when the shapes
are repositioned, flipped or resized.
And moreover, you can connect several shapes at a time, connect shapes automatically,
and turn any shape into a connector.
Connectors
Connecting to the Entire Shape
Connecting to a Shape's Connection Point
Connection Points
Smart Connector
Direct Connector
Connecting Multiple Shapes
Auto-Connection Modes
Connectors are used for tying shapes together. They rebuild automatically and keep the shapes connected even when they are moved, resized, etc.
You can use direct connectors (straight lines) and smart connectors (made up of horizontal and vertical lines).
To draw a Smart Connector, use the Smart Connector tool
on the toolbar or choose Smart Connector from the Insert
menu.
 Ctrl + 9 Ctrl + 9 |
 Ctrl + 9 Ctrl + 9 |
To draw a Direct Connector, use the Direct Connector tool
 on the toolbar or choose Direct
Connector from the Insert menu.
on the toolbar or choose Direct
Connector from the Insert menu.

All connectors have the begin point and the end point (that is, they are 1D shapes). By dragging an endpoint, you can change the form and size of a connector. The most important function of the endpoints is that you can glue them to the shapes or to their connection points to establish connection.

Note: You can always swap the begin and end points by choosing Reverse Link from the connector's context menu.
To break the connection, just carry the connector to some other place or drag its glued endpoints away from the shapes.
You can manipulate the connectors in the same way as you do with other shapes - you can select them, send to back or to front, delete, set formatting (line color and style, arrowheads - see details in the Shapes - Shape Properties - Line Properties section).
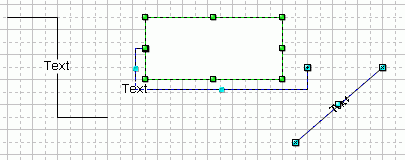
You can also assign text to a connector as to any other shape - just
select it and start typing the text.
On a Smart Connector, the associated text appears on its central control point,
or where the lines meet.
On a Direct Connector, the text stretches along the connector, from its begin
point to the end point.
You can manipulate reposition connector's text with the Text Box tool.
There are two types of connection:
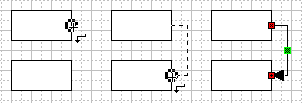
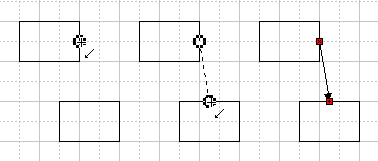
Position one the endpoints of the connector over the center of the shape's alignment box, until a black rectangle appears round the shape. On releasing the mouse button, a magenta square will indicate the point at which the connector is currently glued to the shape. As you move the shape, the point of connection changes its location - it jumps to the middle of the side of the alignment box nearest to the connector.
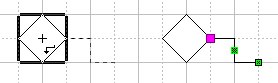
This way of connecting lets you glue the connector to a certain particular place on the shape (or even outside it). The connector will remain attached to this exact place - connection point - when you manipulate the shapes.
Each shape has 4 default connection points - in the middle of each side of its alignment box. They become visible when you position an endpoint of a connector over one of them.
Note: You can create additional connection
points - on the shape or outside it. Use the Connection Point
tool  from
the Drawing Tools toolbar (or the Insert / Connection Point
menu) to create, move and delete connection points.
from
the Drawing Tools toolbar (or the Insert / Connection Point
menu) to create, move and delete connection points.
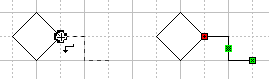
Position one of the endpoints of the connector over the shape, until you see a gray plus in a circle indicating the pointer is over a connection point of the shape. Release the mouse button to establish the connection. The glued endpoint turns red, indicating the place of connection.
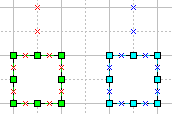 Connection Points
are the points associated with shapes, to which connectors and control handles
can be attached. They look like blue crosses that appear on a shape
or near it. When the shape is primary selected, the connection points
assigned to this shape are displayed in red. Connection points may
lie both on the body of the shape and outside it. Then the red color helps
us tell to which shape the connection point belongs.
Connection Points
are the points associated with shapes, to which connectors and control handles
can be attached. They look like blue crosses that appear on a shape
or near it. When the shape is primary selected, the connection points
assigned to this shape are displayed in red. Connection points may
lie both on the body of the shape and outside it. Then the red color helps
us tell to which shape the connection point belongs.
The Connection Point tool is used to create, move or delete
connection points. To choose it, do one of the following:
a) Click the Connection Point
button on the Drawing Tools toolbar,
b) or select Connection Point from the Insert
menu,
c) or use the keyboard:
| Ctrl + 0 |
Ctrl + 0 |
 To
add a connection point to a shape:
To
add a connection point to a shape:
Note: If the Snap mode
 is on, the connection points you add will be pulled to the nearest snap locations
(normally grid lines and nodes). If you want to position the connection points
precisely, you can turn Snap off on the fly by holding down
the Alt key (in Windows)
or Cmd key (in Mac OS). When you release
the modifier key, the Snap mode will be restored again.
is on, the connection points you add will be pulled to the nearest snap locations
(normally grid lines and nodes). If you want to position the connection points
precisely, you can turn Snap off on the fly by holding down
the Alt key (in Windows)
or Cmd key (in Mac OS). When you release
the modifier key, the Snap mode will be restored again.
If you put a new Connection Point over a shape (no matter whether selected or not), the new connection point is assigned to that shape (the shape will become selected automatically).
If you put a new Connection Point outside any shape, it is assigned to the currently selected shape. If several shapes were selected, the new connection points are added to the shape with primary selection.
In the Connection Point mode
you can select, reposition and delete connection points.
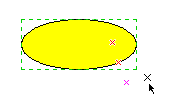
To select a connection point, move the mouse over
it, so that the pointer changes to  , and click the mouse
button. The selected connection point turns magenta. If you need to select several
connection points, hold down Shift when clicking.
, and click the mouse
button. The selected connection point turns magenta. If you need to select several
connection points, hold down Shift when clicking.
To move a connection point, drag it with the mouse
to a new location.
To move several connection points at a time, select them and drag by one of
the selected connection points (start dragging when the pointer changes to
over this connection point).
To delete one or more connection points, select them (hold down Shift for multiple selection) and press the Del key.
In ConceptDraw, you can choose to show / hide connection
points of shapes. Use the Connection Points option in the
View menu to hide or show connection points.
Note that the connection points remain functional even when they are not visible.
When shapes are inside a group, you can still use their connection points. Normally, these connection points are not visible. But when you select a shape in a group, its connection points appear in gray, and you can glue connectors to them.
If you want to always see the connection points of grouped shapes, enable Connection Points in Groups in the View menu.
For more information about the Drawing Tools toolbar, see
Toolbars - Drawing Tools
For more information about the Snap & Glue toolbar, see
Toolbars - Snap & Glue.
 The
Smart Connector is made up of vertical and horizontal lines
which form a solid path. The number of connector legs is not limited by default,
however, you can set a maximal number in the Document
Properties dialog, the Advanced tab. The main feature of the
Smart connector is its ability to change the route depending on how you reposition
connected shapes and if there are other shapes on the way.
The
Smart Connector is made up of vertical and horizontal lines
which form a solid path. The number of connector legs is not limited by default,
however, you can set a maximal number in the Document
Properties dialog, the Advanced tab. The main feature of the
Smart connector is its ability to change the route depending on how you reposition
connected shapes and if there are other shapes on the way.

The Control handles on the legs of the connector let you adjust its shape.
To create a Smart connector, use the Smart Connector tool
from the Drawing Tools toolbar.
To get two shapes connected straight away, start and finish drawing the connector
over the connection points of the shapes.
Another way is to draw a connector first, and then glue its endpoints to the shapes as you need.
Note: You can also choose Smart Connector from the Insert menu to switch to the Smart Connector tool.
| Ctrl + 9 |
Ctrl + 9 |
In ConceptDraw V connectors became even smarter:
If you enable the Flow Around Objects in the connector's context menu, it will avoid shapes on its way. Besides you can choose to display line jumps in places where smart connectors cross each other.
For more information about the Drawing Tools toolbar see Toolbars - Drawing Tools.
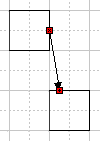
The Direct Connector lets you connect shapes with straight
lines, and rebuilds when the shapes are moved.
You can draw it with the help of the Direct Connector tool
![]() . To get two shapes
connected straight away, start and finish drawing the connector over the connection
points of the shapes.
. To get two shapes
connected straight away, start and finish drawing the connector over the connection
points of the shapes.
Another way is to draw a connector first, and then glue its endpoints to the shapes as you need.
 You can turn any shape
into a connector by simply changing it into a 1D shape. Select the shape and
call the Shape Properties dialog from the Format menu. Choose
the Behavior tab and in the Interaction style
section of this dialog, select Line (1-D). The shape
will show the begin point and the end point which appear in the middle of the
left and right sides of the shape's alignment box.
You can turn any shape
into a connector by simply changing it into a 1D shape. Select the shape and
call the Shape Properties dialog from the Format menu. Choose
the Behavior tab and in the Interaction style
section of this dialog, select Line (1-D). The shape
will show the begin point and the end point which appear in the middle of the
left and right sides of the shape's alignment box.
For a 1D shape, dragging the endpoints affects its width and angle at once. By dragging the size handles, you control its height. If the Rotate tool is on, the endpoints are substituted with rotation handles.
ConceptDraw also offers you handy tools for connecting one shape to several other shapes at a time, by way of connecting to the entire shapes. These following tools are located on the Connecting toolbar:
 Connect with Smart Connector
 Connect with Direct Connector.
To connect a shape to one or more others:
For more information about the Connecting toolbar see Toolbars - Connecting.
In ConceptDraw, you can use the two modes for connecting shapes automatically:
the Smart Connection Mode  (uses the smart connector) and Direct Connection
Mode
(uses the smart connector) and Direct Connection
Mode  (uses direct
connector). The modes can be chosen on the Connecting
toolbar.
(uses direct
connector). The modes can be chosen on the Connecting
toolbar.
When in an auto-connection mode, any shape that you add to the document (draw or drop on the page, paste from another application, take from a library etc.) gets automatically connected to the previously selected shape by an automatic connector.
Auto-connection modes are very useful for quickly sketching large schemes.
You do not need to think about connecting shapes, you just arrange them on
the page.
For example, you can switch to the Smart Connection Mode and
draw or select the initial element of the scheme. Then you draw other elements
of your scheme, and each new shape you add will be connected automatically to
the previous selected shape. You can select a shape and then start creating
a new one which should be connected to it.
For more information about the Connecting toolbar see Toolbars - Connecting.